I wanted to have a little React project of my own to play with, so I have React-ified the entry navigator links on my blog pages. This is partly to in order to get some practice in with this different way of approaching JavaScript interactivity.
What React is
React is a JavaScript library and set of conventions for creating components for interactive web pages. React is designed to slot in to existing pages, meaning that you could use React to create an additional widget for an existing fancy jQuery-based UI with minimum fuss.
React simplifies creating interactions in several ways. First, it frees the programmer from working out how to mutate the HTML DOM to represent changes in state: instead, you supply a function that emits a description of what the DOM should be for the current state, and the React runtime works out automatically how to mutate the DOM to match.
Second, React distinguishes between externally imposed state (accessed as
this.props) versus a minimum of internal state (this.state). This makes it
easier to work on one component by making the flow of information clear. It
also means managing access to data belongs in a separate JavaScript class,
again separating different concerns so that each part can be worked on
separately.
Third, the usual way to write React components is JSX, a superset of JavaScript that adds XML fragments to the language. While this requires adding a compilation step to the build process, it makes the templates more concise and much easier to read at a glance.
Preparation
There are three main translators from the JSX language used to describe React components to standard JavaScript. I’m using Babel because it also allows ES6 (aka ES2015) syntax as much as practicable. Babel is a JavaScript app so you install it in the usual way with NPM:
npm install -g babel
On my Mac I use the text editor Sublime Text, and there is a babel-sublime plug-in that gives me syntax highlighting.
For this project I took what for me is the easy route to compiling the .jsx
files to .js: I added some extra rules to the make system I was already
using to compile the .less files to .css. I am lazy enough to use fswatch
to automatically run make when I change a file:
fswatch -o blog/components/*.jsx blog/style/*.less | xargs -n1 -I{} make
Younger readers will prefer to use Grunt or Gulp or Browserify or somesuch.
Design
The entry-navigation sidebar on my blog entries is essentially a nested hierarchical lists of years, months, and then the entries in one month. To save space the outermost list is presented with the years in a grid rather than a vertical list.
The change I planned for the interactive version was that clicking on a month name expands that month’s list of entries (instead of going to a page listing articles for that month), and the user can similarly expand the years and see the months for that year. I also gave the years a slide-down animation.
Architecture (or lack of it)
This page was too trivial for the full Flux conventions to make sense, but
in deference to Flux I used an EntryStore singleton to manage access to the
entry data used in the navigator. It takes care of making Ajax requests to the
server for year data it does not yet have, calling a callback that stands in
for the change events used in a real Flux store.
There is no need for a dispatcher because there are no actions as such (the entry links are just links). Things would be different if I had gone for the full single-page-app approach, where the entry is fetched as Ajax and loaded in to the current page. In that case the selection of an entry would be an action that would be created by the navigator view, leading to a change event causing the entry-displaying component to display the different entry.
Props versus state
One of the interesting aspects of this game is getting your head around what
is props and what is state. I modelled the navigator with a React component
for each level (EntryNav, EntryNavYear, EntryNavMonth and
EntryNavEntry). At each level internal state of one component is often
expressed by setting props on subcomponents. For example, for the EntryNav
component, which year is currently expanded is state, and it passes this to
the EntryNavYear components through their isActive prop.
The result of this is that some of the completions have no internal state at all, only props.
Loading and animation are states
The EntryStore instance loads the data needed to display a year using Ajax
the first time that year is expanded. It exposes methods that tell the
component whether the data is ready or not; if it is not ready when the
component is first shown in expanded state then the request to load the data
is issued. During the loading period a spinner is shown.
This is modelled in the component with a state variable appearance. This can
have values EXPANDED and COLLAPSED and special value LOADING for when
it would be expanded but the data is not yet available. These values are added
to the HTML as a CSS class like entry-nav-year-expanded.
I wanted to have the year list slide down rather than just appear, and
modelled this similarly by having extra states EXPANDING and COLLAPSING.
These are used as temporary values during the transition between expanded and
collapsed states:
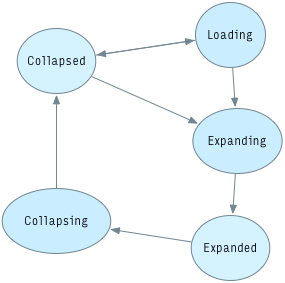
The animation is achieved through a CSS transition: CSS styles for the start
of the expansion are triggered by the entry-nav-year-expanding class. After
one ‘tick’ the JavaScript adds an additional CSS class
entry-nav-year-expanding-active that defines the end state of the transition
(this is an exception to the rule that you don’t mutate the DOM explicitly, so
perhaps I should instead use another state variable). When the transition
finishes the state variable is changed to EXPANDED. The reverse approach is
used to collapse a year.
Conclusion
Using the React conventions makes this simple UI very straightforward. The only tricky part is incorporating the animation—something to one day somehow wrap up in a mixin perhaps.
I did not arrive at this code in my first go; I found I was able to simplify the code a couple of times once I better understood what I was trying to do.
Next I should have a go at incorporating the new navigator in to the blog’s index page.