I thought I might have a go at familiarizing myself with TurboGears, one of the new Python web frameworks, by writing a new and improved clone of the Picky Picky Game. Step one was verifying that I can upload pictures easily. Step two was getting an identity system put together. Creating a registration page and log-in form and so on is the obvious and dull solution, so I thought I’d have a go at exploiting OpenID instead.
But what is OpenID?
Don’t you hate having to learn a new username and password whenever you
want to play on a new web site? Well, the people at LiveJournal
thought you might, so they concocted a system where you (and only you)
use your LiveJournal URL as your log-in name on other sites. If
you are alice on LiveJournal, then your OpenID identifier is
http://alice.livejournal.com/. It isn’t restricted to LiveJournal,
either; anyone can run their own identity server.
Come to Think of it, what is TurboGears?
TurboGears is yet another entrant in Python’s notoriously crowded web-frameworks competition. TurboGears is actaully a sort of Frankestein creation—rather than designing its own quirky template, database and controller conventions, TurboGears uses established, lightweight libraries like Kid, SQLObject, CherryPy, and MochiKit. I had already been thinking it would be nice to swap the Picky Picky Game’s home-brewed templating system with Kid and its controller framework with CherryPy, so finding them nicely packaged up together as TurboGears looks very attractive!
I am not going to attempt to write a TurboGears tutorial here; there is already the 20-minute Wiki movie and a fine TurboGears tutorial. What I will do here is outline the code I wrote. If you, gentle reader, are a web developer who does not already know TurboGears, I hope it will give you a flavour of the brevity of TurboGears code.
Step Zero: Install, Install, Install
Installing TurboGears is a little adventurous on Mac OS X. The first thing you have to do is upgrade Python to version 2.4 (since even the latest Mac OS X revision has Python 2.3), and even the Python web site is mum on how to achieve this. In the end the packages the TurboGears web site points to worked fine. The process of installing TurboGears itself (via something called Easy Install) also worked fine. Most of the time was spent reading the documentation.
Then I decided I wanted to be able to use the latest SQLite as my database driver. This required me to actually install Unix packages from source, something I have gotten out of the habit of, what with everyone supplying fancy installers and Mac OS packages. This required nothing more than the incantations I remember from when I did everything on GNU/Linux boxes:
./configure
make
sudo make install
In the same fashion, installing the Python drivers is very similar, except that Python has its own idiom:
python setup.py build
sudo python setup.py install
I tested this had installed it where Python could find it by starting up
python and doing import pysqlite2.
I was fully prepared to roll my own OpenID library based on the specification—I have done the same with RFC 2617 three times over—but a little poking about on the OpenID site pointed me to a Python library Python-OpenID. Cool!
Building an OpenID-enabled TurboGears Application, Step One
I had already run the tg-admin quickstart command to create a web application
directory. This creates a directory tree with skeletal Python files and Kid
templates ready for you to modify; some people will not like this, but the files
it creates are essentially what you would end up with if you wrote it starting
from scratch (and were very organized), so I’m happy with it.
To add a ‘Please Log In’ page, I started by adding a method to controllers.py:
class Root(controllers.Root):
    ...
    @turbogears.expose(html='picky2.templates.login')
    def login(self, next='./'):
        return dict(next=next)
This tells the server that URLs like http://localhost:8080/login?next=foo are
handled by rendering the template picky2.templates.login (Picky2 is the
application name), passing the value of the next variable as a parameter to
the template. This will be used, once the user is logged in, to redirect them
to the page they started on.
The template in turn is created by copying welcome.kid and
editing to look something like this:
<!DOCTYPE html SYSTEM "xhtml+kid.dtd">
<html xmlns="http://www.w3.org/1999/xhtml" xmlns:py="http://purl.org/kid/ns#"
        py:extends="'master.kid'">
    <head>
        <meta content="text/html; charset=UTF-8" http-equiv="content-type" py:replace="''"/>
        <title>Picky2 Playpen</title>
    </head>
    <body>
        <div id="loginForm" class="form">
            <h1>Log in!</h1>
            <form action="loginBegin" method="get">
                <input type="hidden" name="next" value="${next}"/>
                <p>
                    <label for="urlbox">Log in with your blog URL:</label>
                    <input type="text" name="url" size="60" id="urlbox"/>
                    <input type="submit" value="Log me in!"/>
                </p>
            </form>
        </div>
    </body>
</html>
This is mostly the usual HTML for displaying a form. The point to note is
is that the next parameter is squirrelled away in a hidden form
item.
One nice thing about Kid templates is
they they are well-formed XML; if you have an XML-savvy text editor—such as
jEdit—it can check the syntax of templates as you type, and save you from
generating bad HTML that is only detected when it is in the browser. (In order to
placate jEdit’s XML validator, I created my own XHTML+kid.dtd
document-type definition file; it is supposed to be XHTML with Kid’s attributes
permitted everywhere, but I have only done as much as is necessary to make my
templates validate. Or I could have just removed the !DOCTYPE declaration.)
Now I can switch to my Firefox window and visit the login page to see it all working.
The action attribute for the form element is loginBegin, so I need to add
another method to controllers.py:
import authentication
...

class Root(...):
    ...
    @turbogears.expose(html='picky2.templates.login')
    def loginBegin(self, url, next):
        """Called when user clicks OK on the login form."""
        openId = authentication.openId()
        status, inf = openId.beginAuth(url)
        if status == 'success':
            returnUri = self.openIdReturnUri(inf, next)
            openIdUri = openId.constructRedirect(inf, returnUri, 'http://localhost:8080/')
            raise cherrypy.HTTPRedirect(openIdUri)
        # If we get here, then the OpenID server could not be contacted.
        return dict(error=status, detail=inf, next=next, who=None, openId=None)

    def openIdReturnUri(self, inf, next):
        """Given an OpenID request information object, return a URI on this server."""
        token = uriParamEncode(inf.token)
        next = uriParamEncode(next)
        return 'http://localhost:8080/loginFinish?token=%s&next=%s' % (token, next)
The argument names for the loginBegin method correspond to the form parameters
in the HTML. The url parameter is the URI the user wants to use as their
identifier. The openId object is an instance of OpenIDConsumer
from a module I will write next
that wraps up the Python-OpenID library. The beginAuth method visits the URI
and looks for a link to an OpenID server. If all goes well, it returns the
information needed to make the complete URI of the remote OpenID server with all
the right parameters (via the constructRedirect method). To perform the
redirection, it seems the standard idiom is to throw an cherrypy.HTTPRedirect
exception.
If the OpenIDConsumer object returns anything other than success, this is
passed to the same Kid template (login.kid) as before. Thus it shows the same
form as before, except with an error message added below it. This requires
adding something to the template to include the error message:
<div class="error" py:if="error">
    <p>
         Could not verify your identity
         because of ${error}<span py:if="detail" py:replace="detail">404</span>.
    </p>
</div>
Not elegant, but adequate for my test version. The py:if attribute ensures
this div element completly vanishes if there is no error code.
The big gotcha in the above is in the method openIdReturnUri: the token and
next-URI parameters need to be escaped with uriParamEncode so that they do not
get scrambled when they get read back in at the end. My first attempt omitted
this step, and I got mysterious failures as a result.
Creating the OpenIDController Object
The bit that I have swept under the carpet is the code that actually creates the
OpenIDConsumer object that does most of the work in my loginBegin method. I
put this in its own module out of a sense of tidiness; as it turns out, the
amount of code is small enough that I might as well have simply included it in
controllers.py, but never mind. Here is is:
from pysqlite2 import dbapi2 as sqlite
from openid.consumer import consumer
from openid.store import sqlstore

def openId():
    """Return an object that may be used to authenticate user using the OpenID protocol."""
    #TODO get database info from configuration file...?
    con = sqlite.connect('openid.db')
    store = sqlstore.SQLiteStore(con)
    return consumer.OpenIDConsumer(store)
For now the database used is always called openid.db. I could probably have
simply used the connection settings from TurboGears so as to use the same
database file used to store everything else in my application, but I like the
idea of separating the data managed by Python-OpenID from the rest of my data.
The main gotcha is that I expected the database connection function to be
pysqlite2.connect but it is instead pysqlite2.dbapi2.connect, which took me
a little Googling to find.
Python allows a module to double as a program by adding an if __name__ ==
'__main__' clause at the end. I used this to add the code that must be run once
to initialize the OpenID database:
if __name__ == '__main__':
import sys
if sys.argv[1] == 'create':
print 'Creating tables for OpenID support...'
con = sqlite.connect('openid.db')
store = sqlstore.SQLiteStore(con)
store.createTables()
Step Two: Handling the Return from the OpenID Server
At this point I can enter my LiveJournal URI
http://damiancugley.livejournal.com/ in to the form and press the button and I
am amagically transported to the LiveJournal page that validates OpenID
requests:
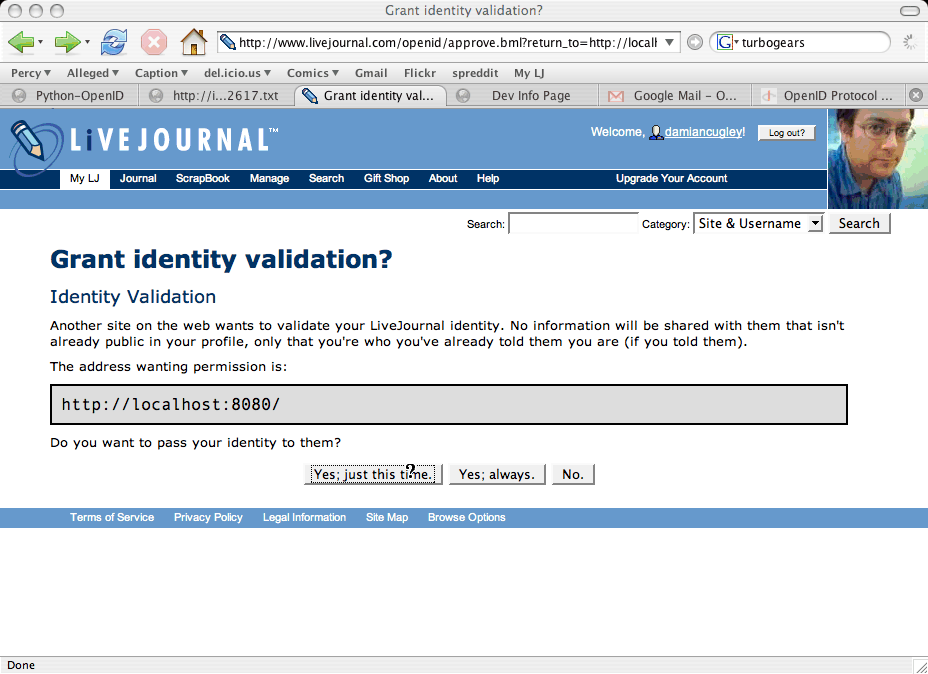
Clicking on the Yes button takes me back to my server, which prompty complains
that I have not defined a loginFinish method yet. (It gets that name from the
return URI parameter included in the OpenID request.) To implement this, we
just add another method to controllers.py as follows:
@turbogears.expose(html='picky2.templates.login')
def loginFinish(self, token, next, **kws):
    """Called when OpenID server has approved user's login.

    token -- as returned by OpenIDConsumer
    next -- as passed to the original login method;
        URI of the page to redirect to once user is authenticated
    """
    # TODO. Check return_to equals expected value
    openId = authentication.openId()
    status, inf = openId.completeAuth(token, kws)
    if status == 'success':
        # TODO. Create cookie
        turbogears.flash('Welcome to Picky2')
        raise cherrypy.HTTPRedirect(next)
    return dict(error=status, detail=None, next=next, who=inf, openId=kws)
There a re a couple of bits that I have not yet put in—thus the TODO
comments—but this method does the bare minimum: it checks the results using
OpenIDConsumer.completeAuth, and redirects to the URL that was originally
passed to the login page and has been passed like a football from page to
page since. The turbogears.flash causes an extra message to appear (I’m not
sure how this works with more than one visitor, unless there is some form of
session management I am unaware ofusing a cookie).
So voilà—a working OpenID consumer in not very many lines of code at all.
What Comes Next?
I have already experimented with uploading pictures; now I need to link up the pictures with the person who uploaded them. When I next have some time for playing with TurboGears, I will report on how I get on with that.